The Machine Panel

The machine panel is the main panel that you use to connect to your machine, change settings, view GRBL settings and G5x work offsets.
The connect/disconnect button is self-explanatory - use this to connect or disconnect from your machine. The settings button allows you to change different settings.
The bar below the connect and settings button is the current buffer status of your GRBL controller.
Below the buffer bar is a drop down to select your desired work offset - the default (and what is selected on program start up and controller connect) is G54. You can also select if needed G55-G59 work offsets manually. Note that if there is a G5x in your code - that will override what you have selected.
Also on this panel is the Home button - click this to home the machine.
Work Offsets
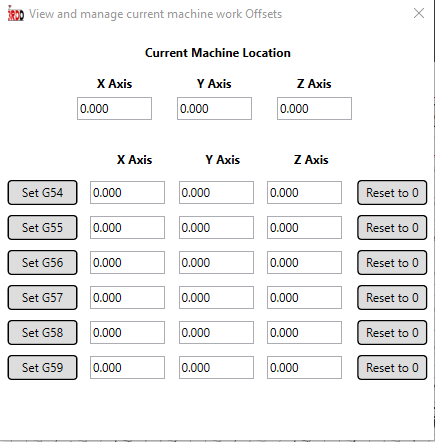
Clicking on the Work Offsets button will display the above screen. This is where you can Set, Change or reset each of the G5x work offsets for the machine. Note *The G5x workoffsets are stored in your GRBL controller (persistant) until you reset them.
-
Setting Work Offsets
- To set a work offset for all axis to the current machine location - Click on the desired G5x button on the left. This will set and save X, Y and Z offset values.
- To set only one of the axis - change the desired G5x axis, and then double-click in the field - this will save only that axis and value without desturbing the others.
- To reset the desired G5x to Zero - click on the Reset button on the right for that work G5x offset.
GRBL Settings
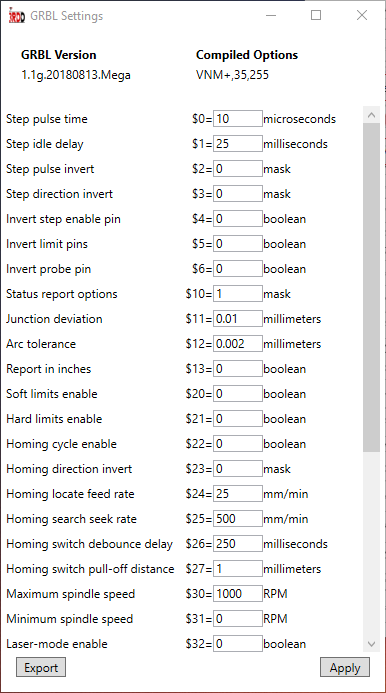
At the top of this window the current version of your GRBL controller is displayed as well as any options associated with it.
Below this is all the current settings on the controller which you can change and then save by clicking on Apply- the new settings will be saved to the Eeprom. If you dont know what each setting does, a short description is also shown.
There is also an Export button where you can export the currently displayed settings to a text file in an easy-to-read format. Very usefull for backing up the settings for future use or testing.
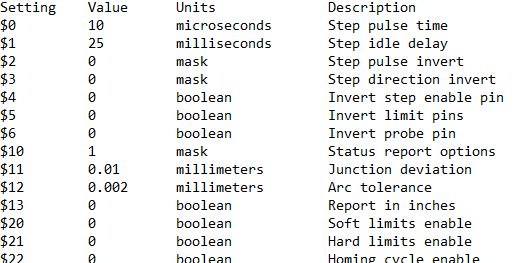
Here is an example of the exported file
$100, $101, $102 FineTune Calculator
Implemented in version 2.0.1.3
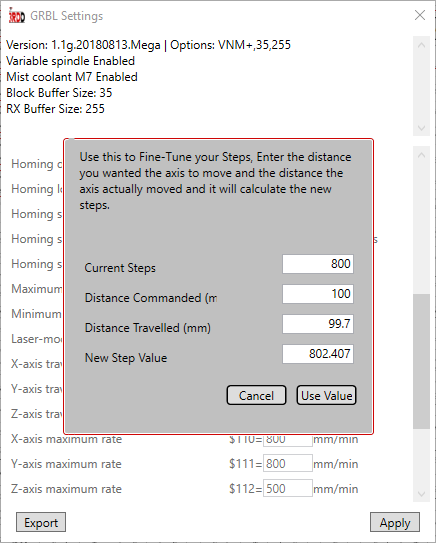
A calculator for fine tuning the steps of your stepper motors has been added. Sometimes when doing the normal calculation of steps_per_mm = (steps_per_revolution*microsteps)/mm_per_rev can result to your steps being out just a little and so makes your moves also slightly out - resulting in either slightly smaller or slightly bigger parts. This can be as much as 0.03mm per 1mm, and added up along say a 100mm piece can be out as much as 0.3mm.
Basic overview on how to use:
- Set your initial steps using the calculation mentioned above - for a 200 step stepper, with x16 microstep and 8mm lead screw the calculation would be
steps_per_mm = (200 * 16) / 8= 400 Steps per mm. Enter this into the required setting ($100, $101, $102). - Zero the machine and mark where the point is - some tape on the spoil board for example.
- In 3RDD GCode Sender - command the machine to jog 50mm to 100mm, when it stops mark that point.
- Grab a tape measure and measure from the start point (where your Zero of axis is) to the end point (where the jog has stopped).
- Open the Calculator Pop-up by double-clicking on the text box for $100, $101, or $102.
- Enter the distance that you command in the relevent box, and the distance actually travelled in the next box. The calcualtion of the new steps will be shown.
- To use the new value, click on Apply and it will replace the previous setting. Do the same for any other axis.
- When values have been calculated and changed, click on Apply at the bottom to update the firmware with the new settings.
- Test and Repeat.
Suppliment
To really dial in and measure below 0.5mm, use a dial guage and jog 1mm and use that value in the calculator, reset then jog 1mm again and repeat until you are close to the commanded value. You can use a different jog value (say 5mm) as long as it is within the specifications of your dial gauge.